Monday, December 23, 2013

Taro Puff


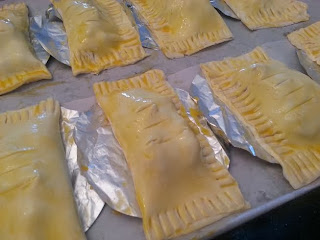
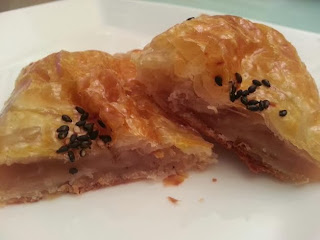
I was very much inspired by the Taro puff I had at Tous Les Jours in Korea and I'd been craving for it for months. So I decided to attempt a replica at home with short cuts! I bought the short crust pastry and frozen yam paste from Phoon Huat because I'm really lazy to make the paste and pastry from scratch. 
Made these Taro puffs last week for my Aunties and cousins during our short trip to Tanjung Pinang. Woke up at 6am to start preparation and it's ready by 7am for 2 batches of puffs. 

Bought this yam paste from Phoon Huat

Recipe for Taro Puffs
Makes: 8 puffs

INGREDIENTS
  • 2 pcs of puff pastry
  • 300g yam paste
  • Egg wash
  • Black sesame seeds with salt


INSTRUCTIONS
  1. Allow the puff pastry to defrost according to package instructions.
  2. Preheat oven to 220 degrees Celsius. 
  3. Cut and divide the puff pastry into 4 equal square parts.
  4. Use 1 1/2 Tbsp of taro paste on the center of the puff pastry.
  5. Fold over and seal the edges by pressing a fork over it.
  6. Place on baking sheet lined with foil or parchment paper.
  7. Brush eggwash over the pastry and sprinkle the black sesame and salt mixture.
  8. Bake for 15-20mins or until brown. 


These Taro puffs are best served warm!

冬至快乐!


Made these cat paw tang yuan yesterday for 冬至 and it brought back so many memories of my Dad. This was the last dish I made for him in April, just one week before his passing and he even commented that I must be too free to make the paws. He finished the entire bowl of tang yuan anyway.  


I followed this recipe from Noobcook and I'm using the Wilton gel coloring. Roll out a ball (size of a 20c coin) and stick a small dough of the other color on the flatten surface. Repeat for the paw prints with even smaller dough of the other color. The hearts and flowers shape are done with cutters.


My 冬至 ended with a sumptuous Japanese dinner of sashimi,  homemade sushi, oyster donburi and garlic beef steak as we are celebrating X'mas in advance at home since the husband will be working through the festive season :(

Saturday, December 14, 2013

Red Velvet Cupcakes with Cream Cheese Frosting


Recipe adapted from here

Red Velvet Cupcakes with Cream Cheese Frosting

Makes approx. 10 cupcakes

INGREDIENTS

Red Velvet Cupcakes

  • 60g unsalted butter (room temperature)
  • 150g sugar
  • 1 egg
  • 1 tbsp cocoa powder
  • 2 tbsp red food coloring
  • 1 tsp pure vanilla extract
  • 150g flour (sifted)
  • 120ml milk
  • 1tsp baking soda
  • 1 1/2 tsp white vinegar
Cream Cheese Frosting
  • 125g unsalted butter (room temperature)
  • 200g cream cheese (room temperature)
  • 60g icing sugar

INSTRUCTIONS
  1. Preheat oven to 170 degrees.
  2. Beat butter on medium to medium high speed until smooth.
  3. Add sugar and continue to beat mixture until light and fluffy.
  4. Add egg and beat until smooth.
  5. Mix cocoa powder with red coloring and vanilla extract.
  6. Add cocoa mixture into batter and mix until even.
  7. Add sifted flour and milk alternately into batter 1/3 at a time and fold in well.
  8. Dissolve baking soda in white vinegar and fold into batter.
  9. Divide batter into liners.
  10. Bake for 20-25mins or until toothpick inserted into the centre comes out clean.
  11. Let cupcakes cool down.
  12. Beat butter and cream cheese until creamy and smooth.
  13. Add sifted icing sugar and mix well.
  14. Scoop frosting into piping bag and pipe frosting on cupcakes.
Additional Cooking Tips:
  • The baking soda and vinegar mixture gives the light and airy texture to the cupcakes and once incorporated into batter, work quickly to get the cupcakes into the oven.


Korean BBQ Pork Belly


I ordered this Korean BBQ pan few weeks ago because the husband and I are always craving for a filling Korean BBQ meal at home (minus the washing). We had been using the airfryer previously but the results ain't too good as it turned out too dry. With this pan, the pork belly, seafood and mushroom are near perfect to the restaurant standards we had in Korea.

We wanted to do the bbq at the dining area but realized it will get too smoky, so we moved to the kitchen.


For a fuss free meal, I used this ready made soybean paste dipping sauce (Ssamjang) although the husband commented that the Ssamjang I made previously tasted better. But this is so convenient!


 She really loves the prawns!


We spent approximately $20 on the pork belly, seafood, mushrooms and lettuce which is a fraction of what we have to pay at a common Korean restaurant. Definitely gonna invite friends over for some BBQ sessions asap!  

Tuesday, December 10, 2013

Cordyceps Chicken Soup

Today's menu was Cordyceps chicken soup only because I didn't have the time and energy to cook as my furbaby is sick. Lucky for me, the preparation and cooking time took only 30 mins with the pre packed Sakura cordyceps chicken with herbs and my pressure cooker.


Basically it's just chopping away the unwanted parts, cleaning of chicken with salt and then throw the chicken with the pre packed ingredients, 5 dried mushrooms and a handful of dried scallops with 1.2L of water into the pressure cooker. Set timer to 15mins when the steam starts coming out from the pressure cooker and Tadah it's done!


Usual timing to simmer the chicken will take approx. 2 hours but it only took me 15mins with pressure cooker to get the same tenderness. I halved the chicken for my Mum and  the other half I placed in the Korean earthernware, season with Hua Diao Jiu and salt and simmer for another 10mins.

This soup is exceptionally comforting on a rainy day, like today. 

Thursday, December 5, 2013

Aglio e Olio with Baked Ebiko Tiger Prawn, Seared Scallops and Button Mushrooms


I bought 4 of these humongous tiger prawns from Chinatown market yesterday and gosh it's so fresh and cheap! And since I had been craving for Aglio e Olio for the longest time, I decided to grill the tiger prawns with ebiko alongside with my favourite pasta dish. I love cooking Aglio Olio at home because it's really easy using my Phillips Airfryer and I can add whatever ingredients as much as I want paying only a fraction of the price dining at restaurants.

Aglio Olio with Crayfish and Scallops
 Aglio Olio with Smoked duck and sunny side up


Recipe for Basic Aglio e Olio with Button Mushrooms

Serves 2

INGREDIENTS
  • 160g - 180g uncooked spaghetti
  • 5-6 button mushrooms, sliced
  • 3 tbsp of olive oil
  • 10 cloves garlic, peeled and thinly sliced
  • 2 tbsp chopped fresh/ dried Italian parsley
  • 2 red chilli padi, sliced with seeds removed or 1/4 tbsp of dried chilli flakes
  • Knob of butter
  • 1 tbsp of Italian herbs
  • Sea salt and black pepper to season

INSTRUCTIONS
  1. Bring a pot of water to a boil over high heat and season generously with sea salt and drizzle of olive oil. Cook pasta until al dente (1-2 mins lesser than the package instructions). Drain and set aside.
  2. Meanwhile preheat airfryer at 180°C and add 1tbsp of olive oil to the baking tin. Add the button mushrooms and air fry for approx. 5mins, stirring occasionally. Remove mushrooms from pan when they have shrunk in size.
  3. In the same baking tin, add 1 tbsp of olive oil. Add half of garlic slices into the hot oil, spreading evenly and cook until garlic turns golden brown. Remove baking tin on a cooling rack.
  4. Add half of chilli padi, 1 serving of cooked spaghetti, parsley, butter and half of mushrooms to the garlic and oil mixture. Sprinkle Italian herbs generously, season with sea salt and black pepper and toss until all ingredients are combined evenly.
  5. Repeat Step 2-4 for another serving.
The must have seasoning for Aglio Olio

Frying garlic in Airfryer


Additional Cooking Tips
  • Season the pasta water to be as salty as sea water and adding olive oil to water will prevent the pasta from sticking.
  • Use a regular frying pan if airfryer is not available with the same steps and cook 2 servings at 1 go.


Grilled Tiger Prawn with Ebiko

Serves 2 ( 2 prawns per serving)

INGREDIENTS
  • 4 tiger prawns
  • 2 tbsp ebiko
  • 2 tbsp cream cheese
  • 1 tbsp Japanese mayonnaise
  • 1 tbsp mozzarella cheese

INSTRUCTIONS
  1. Preheat oven at 200°C
  2. Mix ebiko, cream cheese, mayonnaise and mozzarella cheese together.
  3. Cut back of the shells with scissor. Halve prawns by splitting lengthways through the middle with a sharp knife. 
  4. Remove vein, rinse then pat dry with paper towel.
  5. Place prawns on baking pan and spread ebiko mixture over the prawns.
  6. Bake for 7 mins. Top with mayonnaise and bake for another 3mins.
  7. Garnish with more ebiko and chopped parsely (optional)

Additional Cooking Tips
  • The cooking time might vary according to the size of the prawns.

Monday, December 2, 2013

Lamb Racks with Rosemary


Last week I made this Lamb racks and it was a big hit. It's relatively easy and much cheaper to make this at home than to order this at the restaurants. I bought the rack of lamb from Foodie Market Place at Outrum Road for $4.55/100gms and it's pretty cheap in my opinion. 

Recipe for Lamb racks with Rosemary
Serves: 3 (3 pieces of lamb per person)

INGREDIENTS
  • 1 kg Rack of lamb (approximately 9 pieces) 
  • 6 cloves of garlics, crushed
  • Few stalks of rosemary
  • Knob of butter
  • Olive Oil
  • Dash of white wine
  • 1 cup chicken broth

         Marination:
  • Olive oil
  • Sea salt & black pepper 
  • Few stalks of rosemary  

INSTRUCTIONS
  1. Spread the lamb racks on a large tray and brush olive oil generously on both sides of the meat.
  2. Season evenly on both sides of meat with sea salt and black pepper.
  3. Chop the rosemary into smaller pieces and marinate with the lamb racks covered in the fridge for at least 2 hours.
  4. Heat olive oil in the non stick frying pan until smoking hot.
  5. Place the meat in the hot oil 3 pieces at a time and add 2 crushed garlic and rosemary.
  6. Pan fry for 2-3mins depending on the thickness of the meat.
  7. Leave the meat to rest for 10mins.
  8. Toss some butter into the hot pan and deglaze with a dash of white wine.
  9. Add chicken broth and turn down the heat to simmer and reduce the sauce.

Additional Cooking Tips:
  • Do request for the butcher to cut up the rack of lamb into each individual pieces.
  • Make sure the oil is smoking hot when the meat is placed in the oil to achieve the golden brown sear.
  • Do not move the meat around while cooking unless to flip over to the other side after 2-3mins.
  • Lambs are best eaten medium rare with internal meat temperature at 55 to 60 degree celsius if using meat thermometer to test for doneness.